User:Donner60/sandbox 7
Template:Good article is only for Wikipedia:Good articles.
| Battle of Atlanta | |||||||
|---|---|---|---|---|---|---|---|
| Part of the American Civil War | |||||||
 Confederate fortifications on the southeast side | |||||||
| |||||||
| Belligerents | |||||||
|
|
| ||||||
| Commanders and leaders | |||||||
|
|
| ||||||
| Units involved | |||||||
|
| |||||||
| Strength | |||||||
| 34,863[fn 1] | 40,438[fn 2] | ||||||
| Casualties and losses | |||||||
| 3,722[2] | 5,000 (according to Col. Taylor Beatty of General Hood's staff)[4] | ||||||
 Atlanta Location within Georgia | |||||||
The Battle of Atlanta was a major battle of the Atlanta Campaign of the American Civil War fought on July 22, 1864, just southeast of Atlanta, Georgia. Continuing their summer campaign to seize the important rail and supply hub of Atlanta, Union forces commanded by Major GeneralWilliam Tecumseh Sherman overwhelmed and defeated Confederate forces defending the city under the command of (temporarily appointed) General John Bell Hood. Union Major General James B. McPherson was killed during the battle, the second-highest-ranking Union officer killed in action during the war. Despite the implication of finality in its name, the battle occurred midway through the Atlanta campaign, and the city did not fall until September 2, 1864, after a Union siege and various attempts to seize railroads and supply lines leading to Atlanta.
After taking the city, Sherman's troops headed south-southeastward toward Milledgeville, the state capital, and on to Savannah with the March to the Sea.
The fall of Atlanta had major political ramifications. In the 1864 election, former Union general George B. McClellan, a Democrat, ran against President Lincoln, on a peace platform calling for an armistice with the Confederacy. The capture of Atlanta and Hood's burning of military facilities as he evacuated were extensively covered by Northern newspapers, significantly boosting Northern morale, and Lincoln was re-elected by a significant margin.
Background
Objectives; Preparations
War weariness was growing in the North and President Abraham Lincoln's prospects for re-election were diminishing as a result,[5][fn 3] when on March 9, 1864, Lincoln commissioned Ulysses S. Grant as the only Union Army lieutenant general, then the highest grade in the United States Army.[6][7] On March 10, Lincoln gave Grant command of all the Armies of the United States.[6] On March 12, Grant's appointment as General-in-Chief was publicly announced.[8][9][fn 4] Major General William T. Sherman was assigned to command the Military Division of the Mississippi, including the Department of the Ohio, Department of the Cumberland, Department of the Tennessee and the Department of Arkansas.[8] Sherman took command on March 18.[8][9] The assignment made Sherman commander of the Union armies in the Western Theater of the war.[8]
Grant devised a strategy for Union victory through simultaneous campaigns against several Confederate armies.[10][11] Grant wanted to prevent Confederate armies from reinforcing each other in turn and to fatally weaken the entire Confederate Army.[11] Sherman would lead one of two key campaigns.[12][fn 5] The objective of Sherman's campaign was to defeat and disperse the Confederate Army of Tennessee under the command of General Joseph E. Johnston, to capture the vital railway center of Atlanta, Georgia,[fn 6] to destroy or damage Confederate war resources as much as possible and to split the Confederacy again as had been done at Vicksburg, Mississippi and Port Hudson, Louisiana in July 1863.[13][14]
On May 4, 1864, Sherman was ready to move his armies from Chattanooga, Tennessee toward Ringgold, Georgia with an estimated strength of 112,000 troops.[15] Johnston had between 60,000 and 70,000 effective troops.[15] Johnston had taken advantage of the terrain of woods, hills and rivers in northern Georgia by entrenching his army at Dalton, Georgia, about one-quarter of the way between Chattanooga and Atlanta.[16][fn 7][17] Historian Allan Nevins wrote that Sherman's numerical advantage did not make Johnston's position hopeless in view of his fortified line of defenses in the rough, confusing, mountainous, wooded country of northwestern Georgia which had poor roads and three difficult rivers to cross.[14][18] Because Sherman had to keep his Western and Atlantic Railroad supply line open, he could break away from it only for short periods of time.[19][fn 8]
Atlanta Campaign from May 4 to July 16
The Atlanta campaign opened between May 4 and May 6, 1864 with Union and Confederate forces skirmishing along Rocky Face Ridge.[14] On May 7, Sherman decided that Johnston's main position at Dalton, Georgia, defended in large part by the entrenchments along Rocky Face Ridge, was too strong to assault.[20] He then moved his forces to turn Johnston's left flank at Snake Creek Gap.[20][fn 9] In a diversionary attack on May 8, the Union forces of Major General Thomas and Major General John M. Schofield could not penetrate Dug Gap on Rocky Face Ridge.[21][22] A Union cavalry force followed by McPherson's army passed through Snake Creek Gap that night but withdrew the next day.[23] McPherson decided that the Confederate defenses were too strong to attack.[24] By May 10, Johnston realized that Sherman was trying to turn his left flank at Resaca and Snake Creek Gap.[25] On May 12, as Sherman's army was nearing Resaca, Johnston evacuated Dalton to keep Sherman's forces in front of the Confederate line at Resaca.[26] This ended The Battle of Rocky Face Ridge with Sherman's force occupying a strong position along the ridge and moving into Dalton.[27]
On May 13, Johnston was joined by Polk's force and with most of his own forces took up new positions facing the advance of almost Sherman's entire force toward Resaca. On May 14 and May 15, Sherman's forces took the Confederate positions at the Battle of Resaca with both sides suffering heavy casualties.[28] In view of the Union advance, Johnston withdrew his forces from Dalton on May 15.Cite error: The <ref> tag has too many names (see the help page). Again outflanked, Johnston began withdrawing from Resaca on the evening of May 15.[28]Cite error: The <ref> tag has too many names (see the help page).Cite error: The <ref> tag has too many names (see the help page). Sherman did not expect the Confederates to withdraw overnight and did not oppose it.[29] The withdrawal enabled Sherman's armies to cross the Oostanaula River over a wagon bridge that Sherman's skirmishers saved from destruction during the night at fords which Johnston failed to defend.[30][31] After scattered fighting near Cassville on May 18-19 Johnston further withdrew his forces toward the Etowah River.[32][33]
The opening battles of the Atlanta campaign set a pattern for the campaign until Johnston was relieved of command on July 17. Sherman continued to push Johnston's army farther south through flanking maneuvers and a series of significant and hard fought, but mostly relatively small, engagements.[34][fn 10]
On June 14, at the Battle of Pine Mountain, one of a series of military operations from June 9 through July 3, 1864 collectively called the Battle of Marietta, Confederate Lieutenant General Leonidas Polk was killed by an artillery shell after Confederate commanders standing at the top of Pine Mountain were spotted by Sherman himself, who ordered the artillery fire.[35][36] Major General William Wing Loring temporarily replaced Polk as corps commander but returned to division command when he was replaced as corps commander on July 7 by Lieutenant General Alexander P. Stewart.[35]
The next large battle after Resaca was the Battle of Kennesaw Mountain on June 27, 1864.[37] Johnston had contracted his line in the vicinity of the mountain.[37] Although Thomas urged Sherman to advance by sapping trenches, Sherman ordered a general, frontal assault against the Confederate position. This resulted in heavy Union casualties of between 2,051 and 3,000 men, without dislodging the Confederates, who lost about between 442 and 1,000 men.[fn 11][fn 12] Sherman then began to move his main forces around the Confederate right flank.[38] The Union flanking movement forced the Confederates out of their trenches and Union forces entered Marietta, Georgia on July 3.[38]
Against light opposition, Schofield's army crossed the Chattahoochee River on July 8.[39] Sherman's army group pushed Johnston's army beyond the Chattahoochee by July 10.[38] After a pause to allow his forces to rest, Sherman's main force began to cross the Chattahoochee on July 17.[40]
Hood's command and offensive, July 17 to July 21
On July 17, 1864, Confederate President Jefferson Davis, who was frustrated by Johnston's continuous withdrawal toward Atlanta, replaced Johnston as commander of the Army of Tennessee with Lieutenant General John Bell Hood[41]. Hood was promoted temporarily to full general but never confirmed in that grade by the Confederate Senate.[41] Sherman knew that Hood had a reputation for recklessness and welcomed the Confederate change of command.[41] Major General Benjamin F. Cheatham succeeded Hood as corps commander.[41]
After taking command of the Army of Tennessee, on July 20, 1864, Hood went on the offensive Major General George Thomas's Army of the Cumberland as they crossed Peachtree Creek resulting in the Battle of Peachtree Creek (sometimes called Hood's First Sortie).[42] The forces were about equal at 20,000 men each but the Confederates suffered 4,796 casualties while the Union forces lost only 1,779.[42] On the same date, Union and Confederate forces skirmished at Bald Hill, or Leggett's Hill, near Decatur, Georgia and at Flint Hill Church and the Howard House at Atlanta.[42]
On July 21, Union and Confederate forces fought again at Bald (or Legett's) Hill after Hood had sent Hardee's corps on a 15-mile march to intercept McPherson's force approaching from the east.[42] Union Major General Frank Blair, Jr's. division drove Confederate Major General Patrick Cleburne's division from Bald Hill after a sharp fight, which enabled the Union soldiers to see the entire city of Atlanta from the hill.[42] The Battle of Atlanta followed the next day.[42]
Opposing forces
Sherman's forces in the Atlanta campaign included three armies: the Army of the Tennessee under Major General James B. McPherson (until he was killed at the Battle of Atlanta); the Army of the Cumberland under Major General George H. Thomas and the small Army of the Ohio (including only the XXIII Corps and a few small units) under Major General John M. Schofield. After McPherson's death, the Army of the Tennessee was commanded at the Battle of Atlanta by Major General John A. Logan[43][44] The Army of the Tennessee comprised the XV Corps initially under the the command of Logan, then under the command of Brigadier General Morgan L. Smith; the XVI Corps under the command of Major General Grenville M. Dodge, and the XVII Corps under the command of Major General Frank P. Blair Jr.[45]
The Confederate Army of Tennessee was commanded by General Joseph E. Johnston until July 17, 1864, when he was replaced by Lieutenant General John Bell Hood. At the start of the campaign, the Army of Tennessee comprised three infantry corps under the command Lieutenant Generals William J. Hardee, Leonidas Polk and John Bell Hood, and a cavalry corps under Major General Joseph Wheeler.[fn 13][46] After Polk was killed on June 14, he was temporarily replaced in corps command by Major General William Wing Loring and on July 7 by Lieutenant General Alexander P. Stewart.[35][fn 14]
Many, but not all, of the units of both armies fought in the Battle of Atlanta and related action at Decatur on July 22, 1864.[fn 15]
The armies, corps, divisions and brigades in the Union Order of Battle at the Battle of Atlanta under the overall command of Maj. Gen. William T. Sherman were:
At Atlanta
- The Army of the Tennessee under the command of Maj. Gen. James B. McPherson, and after he was killed in action under the command of Maj. Gen. John A. Logan:
- Fifteenth Corps: Maj. Gen. John A. Logan, then Brig. Gen. Morgan L. Smith. ••First Division: Brig. Gen. Charles R. Woods: •••First Brigade: Col. Milo Smith. •••Second Brigade: Col. James A. Williamson. •••Third Brigade: Col. Hugo Wangelin. •••Artillery: Maj. Clemens Landgraeber. ••Second Division: Brig. Gen. Morgan L. Smith, then Brig. Gen. Joseph A. J. Lightburn. •••First Brigade: Col. James S. Martin. •••Second Brigade: Brig. Gen. Joseph J. A. Lightburn, then Col. Wells S. Jones. •••Artillery: Capt. Francis De Gress. ••Fourth Division: Brig. Gen. William Harrow. •••First Brigade: Col. Reuben Williams. •••Second Brigade: Brig. Gen. Charles C. Walcutt. •••Third Brigade: Col. John M. Oliver. •••Artillery: Capt. Henry H. Griffiths.
- Sixteenth Corps: Maj. Gen. Grenville M. Dodge. ••Second Division: Brig. Gen. Thomas W. Sweeny. •••First Brigade: Brig. Gen. Elliott W. Rice. •••Second Brigade: Col. August Mersy (wounded), then Lt. Col. Robert N. Adams. •••Artillery: Capt. Frederick Welker. ••Fourth Division: Brig. Gen. John W. Fuller. •••First Brigade: Col. John Morrill (wounded), then Lt. Col. Henry T. McDowell. •••Artillery: Capt. George Robinson.
- Seventeenth Corps: Maj. Gen. Frank P. Blair, Jr.: ••Third Division: Brig. Gen. Mortimer D. Leggett. •••First Brigade: Brig. Gen. Manning F. Force (wounded), then Col. George B. Bryant. •••Second Brigade: Col. Robert K. Scott (captured), then Lt. Col. Greenberry F. Wiles. •••Third Brigade: Col. Adam G. Malloy. •••Artillery: Capt. William S. Williams. ••Fourth Division: Brig. Gen. Giles A. Smith. •••First Brigade: Col. Benjamin F. Potts. •••Third Brigade: Col. William Hall. •••Artillery: Capt. Edward Spear, Jr.
- The Army of the Ohio (Twenty-Third Corps) under the command of Maj. Gen. John M. Schofield. ••Second Division: Brig. Gen. Milo S. Hascall. •••Artillery: Capt. Joseph C. Shields. •••Third Division: Brig. Gen. Jacob D. Cox. **Artillery: Maj. Henry M. Wells.[47]
At Decatur
- Army of the Cumberland under the command of Maj. Gen. George H. Thomas. •Cavalry Corps: Brig. Gen. Washington L. Elliott. ••Second Division: Brig. Gen. Kenner Garrard. •••Chicago Board of Trade Battery: two sections under Lt. Trumbull D. Griffin and Lt. Henry Bennett.
- The Army of the Ohio (Twenty-Third Corps) under the command of Maj. Gen. John M. Schofield. ••Third Division: Brig. Gen. Jacob D. Cox. •••First Brigade: Brig. Gen. James W. Reilly.
- The Army of the Tennessee under the command of Maj. Gen. James B. McPherson, and after he was killed in action under the command of Maj. Gen. John A. Logan. •Sixteenth Corps: Maj. Gen. Grenville M. Dodge. ••Second Division: Brig. Gen. Thomas W. Sweeny. •••Second Brigade: Col. August Mersy (wounded), then Lt. Col. Robert N. Adams. •••Artillery: Capt. Frederick Welker. ••Fourth Division: Brig. Gen. John W. Fuller. •••Second Brigade: Col. John W. Sprague. •••Artillery: Lt. Henry Shier.[48]
The Confederate army at the Battle of Atlanta was The Army of Tennessee under the command of Gen. John Bell Hood. The corps, divisions and brigades and their commanders in the Confederate Order of Battle were:
At Atlanta:
- Hardee's Corps: Lt. Gen. William J. Hardee. ••Bates Division: Maj. Gen. William B. Bate. •••Finley's Brigade: Brig. Gen. Jesse J. Finley. •••Lewis's Brigade: Brig. Gen. Joseph H. Lewis. •••Tyler's Brigade: Brig. Gen. Thomas B. Smith. •• Cheatham's Division: Brig. Gen. George E. Maney. ••• Maney's Brigade: Col. Francis M. Walker (killed). •••Stahl's Brigade: Brig. Gen. Otho F. Strahl (wounded). •••Vaughan's Brigade: Col. Michael Magrevney, Jr. •••Wrights Brigade: Col. John C. Carter. ••Cleburne's Division: Maj. Gen. Patrick R. Cleburne. •••Govan's Brigade: Brig. Gen. Daniel C. Govan. ••• Lowrey's Brigade: Brig. Gen. Mark P. Lowrey. •••Smith's Brigade: Brig Gen. James A. Smith (wounded), then Col. Roger Q. Mills (wounded), then Lt. Col. Robert B. Young. ••Walker's Division: Maj. Gen. William H. T. Walker (killed), then Brig Gen. Hugh W. Mercer. •••Gist's Brigade: Brig. Gen. States R. Gist (wounded), then Col. James McCullogh. •••Mercer's Brigade: Brig. Gen. Hugh W. Mercer, then Col. Charles H. Olmstead (wounded), then Col. William Barkuloo (wounded), then Lt. Col. Morgan Rawls (wounded), then Lt. Col. Cincinnatus S. Guyton. •••Stevens's Brigade: Col. George A. Smith (wounded). ••Artillery: Col. Melancthon Smith. •••Cobb's Battalion: Maj. Robert H. Cobb. •••Hotchkiss's Battalion: Maj. T. R. Hotchkiss. •••Hoxton's Battalion: Maj. Llewellyn Hoxton. •••Martin's Battalion: Maj. Robert Martin.
- Hood's Corps: Maj. Gen. Benjamin F. Cheatham. ••Clayton's Division: Maj. Gen. Henry D. Clayton. •••Baker's Brigade: Col. John H. Higley. Gibson's Brigade:Brig. Gen. Randall L. Gibson. •••Holtzclaw's Brigade: Col. Bushrod Jones. •••Stovall's Brigade: Col. Abda Johnson. ••Hindman's Division: Brig. Gen. John C. Brown. •••Dea's Brigade: Col. John G. Coltart. •••Manigault's Brigade: Brig. Gen. Arthur M. Manigault. •••Tucker's Brigade: Col. Jacob H. Sharp. •••Walthall's Brigade: Col. Samuel Benton (mortally wounded), then Col. William F. Brantley. ••Stevenson's Division: Maj. Gen. Carter L. Stevenson. •••Brown's Brigade: Col. Joseph B. Palmer. •••Cumming's Brigade: Brig. Gen. Alfred Cummings. •••Pettus's Brigade: Brig. Gen. Edmund W. Pettus. •••Reynold's Brigade: Brig. Gen. Alexander W. Reynolds. ••Artillery: Col. Robert F. Beckham. •••Courtney's Battalion: Maj. Alfred R. Courtney. Eldridge's Battalion: Maj. J. Wesley Eldridge. Johnston's Battalion Maj. John W. Johnston. ••Georgia Militia: Maj. Gen. Gustavus W. Smith. Two Brigades. •••Artillery: ••••Anderson's Georgia Battery: Capt. Ruel W. Anderson. ••••Lumden's Alabama Battery: Capt. Charles L. Lumden.[49]
At Decatur: The Army of Tennessee under the command of Gen. John Bell Hood.
- Wheeler's Cavalry Corps: Maj. Gen. Joseph Wheeler. ••Martin's Division: Maj. Gen. William T. Martin. •••Allen's Brigade: Brig. Gen. William W. Allen. •••Iverson's Brigade: Brig. Gen. Alfred Iverson. ••Kelly's Division: Brig. Gen. John H. Kelly. •••Anderson's Brigade: Col. Robert H. Anderson. •••Dibrell's Brigade: Col. George G. Dibrell. •••Williams's Brigade: Brig. Gen. John Stuart Williams. ••Artillery: Lt. Col. Felix H. Robertson.
Army of Mississippi: Lt. Gen. Alexander P. Stewart. •••Ferguson's Brigade: Brig. Gen. Samuel W. Ferguson.[50]
Battle
Hood ordered Lieutenant General William J. Hardee's corps on a march around the Union left flank, had Major General Joseph Wheeler's cavalry march near Sherman's supply line, and had Major General Benjamin Cheatham's corps attack the Union front. However, it took longer than expected for Hardee to get his men into position. Confederate Major General William H. T. Walker was killed—shot from his horse by a Union sharpshooter as he scouted the front to prepare his forces for the beginning of the battle.[51] During the time that Hardee's corps was deploying for an attack, McPherson had correctly deduced a possible threat to his left flank. He sent XVI Corps, his reserve, to help strengthen the position.[1] Hardee's men met this other force, and the battle began. About this time, McPherson, rode to the front with two aides to determine the situation and redeploy some regiments as gunfire continued to build to the south of his line. While on this reconnaissance, McPherson was shot and killed by Confederate infantry unexpectedly moving forward. When the Confederates called on him to halt, he turned his horse and tried to escape after refusing a demand to surrender.[52][53]
Although the initial Confederate attack was repulsed, the Union left flank began to retreat under heavy pressure.Initially, Hardee's column took the Flat Shoals Road toward McPherson's position. Union troops under Brigadier General Mortimer D. Leggett, commanding the 3rd Division of the XVII Corps moved back from the road and swung to a more east- west position to fill a gap between Blair's corp and Dodge's corp and defend Bald Hill. The main lines of battle now formed an "L" shape, with Hardee's attack forming the lower part of the "L," and Cheatham's attack on the Union front as the vertical member of the "L". Hood intended to attack the Union troops from both east and west. The fighting centered on a hill east of the city known as Bald Hill. The Federals had arrived two days earlier, and began to shell the city proper, killing several civilians.[54][page needed] A savage struggle, sometimes hand-to-hand, developed around the hill, lasting until just after dark. The Federals held the hill while the Confederates retired to a point just south of there.
Meanwhile, two miles to the north, Cheatham's troops had broken through the Union lines at the Georgia railroad. In response, twenty artillery pieces were positioned on a small knoll near Sherman's headquarters and shelled the Confederates, while Logan's XV Corps regrouped and repulsed the Southern troops.[1][55]
In a separate action near Decatur, Colonel John W. Sprague, in command of the 2nd Brigade, 4th Division of the XVI Corps,[56] was attacked by Wheeler's cavalry. Wheeler had taken the Fayetteville Road and moved into the town of Decatur. Union troops fell back from the town while successfully protecting the ordnance and supply trains of the XV, XVI, XVII, and XX corps. Sprague received some reinforcements but Wheeler withdrew due to being recalled by Hardee three times in quick succession at about 5:00 p.m. to help in Hardee's attack on Bald Hill. Sprague was later awarded the Medal of Honor for his actions.[57]
The Union had suffered over 3,700 casualties, including Major General McPherson,[58] while the Confederate army's casualties were about 5,500.[3] This was a heavy loss for the already reduced Confederate army, but they still held the city.
-
 Palisades and chevaux de frise in front of the Potter (or Pondor) House, Atlanta, Georgia, 1864
 -
 Atlanta Campaign: Atlanta and Vicinity (Summer 1864).
 -
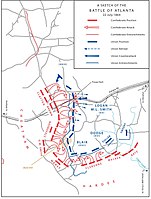 A sketch of the Battle of Atlanta, July 22, 1864.
 -
 Positions of the 17th Army Corps, July 22, 1864.
 -
 Battle of Atlanta, GA., July 22, 1864


Aftermath


Sherman settled into a siege of Atlanta, shelling the city and sending raids west and south of the city to cut off the supply lines from Macon, Georgia. Both of Sherman's cavalry raids including McCook's raid and Stoneman's Raid were defeated by Confederate cavalry collectively under General Wheeler. Although the raids partially achieved their objective of cutting railroad tracks and destroying supply wagons, they were soon after repaired and supplies continued to move to the city of Atlanta.[59][page needed] [54][page needed] Following the failure to break the Confederates' hold on the city, Sherman began to employ a new strategy. He swung his entire army in a broad flanking maneuver to the west.[54][page needed] Finally, on August 31, at Jonesborough, Georgia, Sherman's army captured the railroad track from Macon, pushing the Confederates to Lovejoy's Station. With his supply lines fully severed, Hood pulled his troops out of Atlanta the next day, September 1, destroying supply depots as he left to prevent them from falling into Union hands. He also set fire to eighty-one loaded ammunition cars, which led to a conflagration watched by hundreds.[60]
On September 2,[61] Mayor James Calhoun,[62] along with a committee of Union-leaning citizens including William Markham,[60] Jonathan Norcross, and Edward Rawson, met a captain on the staff of Major General Henry W. Slocum, and surrendered the city, asking for "protection to non-combatants and private property".[60] Sherman, who was in Jonesboro at the time of surrender,[60] sent a telegram to Washington on September 3, reading, "Atlanta is ours, and fairly won".[63][64]
Within a week of the fall of Atlanta, Sherman had ordered all non-military personnel out of Atlanta. Reportedly he remembered the cities of Memphis and Vicksburg which became a burden immediately after victory, so he told the civilians specifically to go north or go south. A truce of sorts was quickly established at a town nearby called Rough And Ready with General Hood, where Union and Confederate prisoners were in small numbers exchanged and civilians wishing to go south could get help to that end.[59][page needed] After the battle, Sherman established his headquarters in Atlanta on September 7. He stayed until November 15 when the Army of the Tennessee, then commanded by Major General Oliver O. Howard and consisting of two corps and the newly formed Army of Georgia, commanded by Major General Henry W. Slocum, also with two corps, departed for Savannah on the campaign known as "Sherman's March to the Sea".[61]
Despite the damage caused by the war, Atlanta recovered from its downfall relatively quickly; as one observer noted as early as November 1865, "A new city is springing up with marvelous rapidity".[65][66]
Political Ramifications
The fall of Atlanta and the success of the overall Atlanta Campaign were extensively covered by Northern newspapers, and were a boon to Northern morale and to President Lincoln's political standing. In the 1864 election, Democratic challenger George B. McClellan ran against Lincoln. McClellan ran a conflicted campaign: McClellan was a Unionist who advocated continuing the war until the defeat of the Confederacy, but the Democratic platform included calls for negotiations with the Confederacy on the subject of a potential truce. The capture of Atlanta and Hood's burning of military facilities as he evacuated showed that a successful conclusion of the war was in sight, weakening support for a truce. As a result, Lincoln was re-elected by a wide margin, with 212 out of 233 electoral votes.[61]
Legacy
In 1880, Atlanta ranked among the fifty largest cities in the United States.[65] The battlefield is now urban, residential, and commercial land, with many markers memorializing notable events of the battle,[67] including McPherson's place of death. The marker was erected in 1956 by the Georgia Historical Commission.[68] To commemorate the 140th anniversary of the battle, in 2004, two new markers were erected in the Inman Park neighborhood. The Atlanta Cyclorama building, built in 1921 and listed on the National Register of Historic Places, is located in Grant Park and formerly contained a panoramic painting of the battle.[65][69] In 2014, the City of Atlanta sold the Battle of Atlanta Cyclorama to Atlanta History Center.[70] Atlanta History Center constructed new, purpose-built building at their Buckhead Campus to house the art piece. The painting itself underwent an extensive restoration to reverse changes made to the original painting in the 1890s.[71] The Cyclorama and accompanying exhibition (Cyclorama: The Big Picture) opened at Atlanta History Center on February 22, 2019.[72]
One notable establishment destroyed by Union soldiers was the Potter (or Ponder) House, built in 1857, and owned by Ephraim G. Ponder, a holder of 65 slaves before the war. In the battle, it was used by Confederate sharpshooters until Union artillery inflicted heavy damage. It was never rebuilt. One of Ponder's slaves, Festus Flipper, was the father of Henry Ossian Flipper, who later became the first African American cadet to graduate from the United States Military Academy at West Point.[73]
-
 Georgia Historical Marker for the surrender of Atlanta
 -
 The Potter (or Ponder) House in Atlanta housed Confederate sharpshooters until Union artillery made a special target of it
 -
 Map of Atlanta battlefield core and study areas by the American Battlefield Protection Program


Footnotes
- ^ Livermore (pp. 122–123, 142) cites values of Union troops as 34,863 present for duty and 30,477 effective
- ^ Livermore (pp. 122–123, 142) cites values of Confederate troops as 40,438 present for duty and 36,934 effective.
- ^ Lincoln was nominated for a second term on June 8, 1864. Eicher, 2001, p. 704.
- ^ The previous General-in-Chief, Major General Henry Halleck, was named chief of staff. Long. 1971, p.474.
- ^ The other key campaign was the Overland campaign. The Bermuda Hundred campaign and the Shenandoah Valley campaigns of 1864 were to support the Overland campaign. Instead of being prepared to move on Mobile when Sherman was ready to move on Atlanta, Union Major General Nathaniel Banks had led his forces on the unsuccessful Red River campaign and was not able to support Sherman at any time during the Atlanta campaign. The delayed and failed Red River campaign damaged an important part of Grant's strategy by enabling Confederate Lieutenant General Leonidas Polk to send reinforcements to Johnston. Nevins, 1971. p. 25.
- ^ The Western and Atlantic Railroad from the north connected at Atlanta to the Macon and Western Railroad to the south. In turn the Macon and Western connected with the Central of Georgia Railroad which ran to Savannah, Georgia at the coast. The Western and Atlantic connected to the Georgia Railroad to the east. The Georgia Railroad ran from Atlanta to Augusta, Georgia where it connected to lines reaching Charleston, South Carolina, Raleigh, North Carolina and Richmond, Virginia. The final major connection of the Western and Atlantic at Atlanta was to the Atlanta & West Point Railroad to the southwest. The Atlanta and West Point ran to the Alabama border where it connected to lines to Montgomery, Alabama and indirectly to Selma, Alabama and Mobile, Alabama. Black III, 1952, p. 6; Castel, 1992, p. 69.
- ^ Johnston also had seventeen more defensive positions laid out to his rear over the course of the campaign. Hess, 2018, p. 3.
- ^ Sherman had to detach troops to guard the Western and Atlantic Railroad from the point of his advance back to Chattanooga and through Tennessee to keep his supply line secure. During the campaign, the railway was under constant threats and attacks from cavalry and guerrillas. Nevins, 1971, p. 53.
- ^ Johnston expected Sherman to approach his line from the northwest and north as Major General George H. Thomas's lieutenant, Major General John M. Palmer did on a short demonstration toward Dalton in February, 1864. Hess, 2018, p. 27. Thomas joined the February expedition some days later due to illness. He sent a force to look for gaps farther south away from the defensive line. Hess, 2018, p. 27. The Union scouts found the pass at Snake Creek Gap, 12 miles south of Mill Creek Gap. Hess, 2018, p. 28. By May, Johnston had sent Brigadier General James Cantey's brigade to hold Resaca and cover the roads from the west, but did not specifically tell Cantey to defend Snake Creek Gap, Hess, 2018, p. 29. Cantey did not even post pickets at the gap. Castel, 1992, p. 138.
- ^ The Battle of Kennesaw Mountain on June 27, 1864 was a large engagement during this period of time.
- ^ Eicher, 2001, p. 703 gives the lower number; Nevins, 1971, pp. 54-55 gives the higher number.
- ^ Union Brigadier General Charles Garrison Harker was killed and Union Brigadier General Daniel McCook, Jr. was mortally wounded at the battle. Nevins, 1971, p. 55; Eicher, 2001, p. 703.
- ^ Polk's force also was known as the Army of Mississippi, Eicher, 2001, p. 696.
- ^ At the start of the campaign, Sherman's armies had 254 cannons; Johnston's forces had 144 cannons. Castel, 1992, p. 115.
- ^ See the separate order of battle articles.
Citations
- ^ a b c d e f g h i j "Battle Summary: Atlanta, GA". National Park Service. Archived from the original on October 19, 2013. Retrieved December 27, 2010.
- ^ Davis, Stephen, All the Fighting They Want: The Atlanta Campaign from Peachtree Creek to the City's Surrender, July 18–September 2, 1864 (Emerging Civil War Series), p. 99
- ^ a b Bonds 2009, p. 172.
- ^ a b Castel, Albert E. (1992). Decision in the West: The Atlanta Campaign of 1864. Modern War Studies. Lawrence, KS: University Press of Kansas. p. 412. ISBN 9780700605620. OCLC 25712831.
- ^ Nevins, 1971, pp. 29-31.
- ^ a b Long, 1971, p. 473.
- ^ Castel, 1992, p. 64.
- ^ a b c d Long, 1971, p. 474.
- ^ a b Castel, 1992, p. 67.
- ^ Castel, 1992, p. 68.
- ^ a b Nevins, 1971, p. 12.
- ^ Nevins, 1971, p. 9.
- ^ Nevins, 1971, pp. 9, 25.
- ^ a b c Eicher, 2001, p. 697.
- ^ a b Nevins, 1971, p. 24.
- ^ Nevins, 1971, pp. 25, 52.
- ^ Nevins, 1971, p. 25.
- ^ Nevins, 1971, p. 52.
- ^ Hess, 2018, p. 2.
- ^ a b Hess, 2018, p. 29.
- ^ Hess, 2018, p. 34.
- ^ Castel, 1992, p. 132.
- ^ Hess, 2018, p. 30.
- ^ Castel, 1992, p. 139.
- ^ Castel, 1992, p. 145.
- ^ Castel, 1992, pp. 147, 150.
- ^ Castel, 1992, pp. 150-151.
- ^ a b Hess, 2012, p. 214.
- ^ Castel, 1992, p. 180.
- ^ Nevins, 1971, p. 52.
- ^ Eicher, 2001, p. 699.
- ^ Eicher, 2001, pp. 696-700.
- ^ Castel, 1992, p. 181.
- ^ Nevins, 1971, p. 53
- ^ a b c Eicher, 2001, p. 702.
- ^ Hess, 2018, pp. 87-88.
- ^ a b Nevins, 1971, p. 54.
- ^ a b c Nevins, 1971, p. 55.
- ^ Eicher, 2001, p. 706.
- ^ Nevins, 1971, p. 57.
- ^ a b c d Eicher, 2001, p. 707.
- ^ a b c d e f Eicher, 2001, p. 708.
- ^ Ecelbarger, 2010, p. 233.
- ^ Hess, 2023, p. 317.
- ^ Ecelbarger, 2010, p. 237.
- ^ Eicher, pp. 696–97.
- ^ Hess, 2023, pp. 317-321.
- ^ Hess, 2023, pp. 327-328.
- ^ Hess, 2023, pp. 321-327.
- ^ Hess, 2023, pp. 218-219.
- ^ Hess, 2023. pp. 79-81.
- ^ Castel, 1992, p. 398.
- ^ Hess, 2023, pp. 94-110.
- ^ a b c Garrett 1987.
- ^ Hess uses the name Copenhill for the location, Hess, 2023, pp. 146, 174, but the name appears to be an anachronism based on the Wikipedia article. The NPS citation, which does not use a name for the hill, otherwise supports the facts in the sentence and conforms to other sources.
- ^ Ecelbarger 2010, p. 236.
- ^ "Civil War Medal of Honor Recipients (M–Z)". U.S. Army Center of Military History. Archived from the original on December 31, 2010. Retrieved December 27, 2010.
- ^ Ecelbarger 2010, p. 211.
- ^ a b Matthews, Byron H. (1976). The McCook-Stoneman Raid. Brannon Publishing.
- ^ a b c d Garrett 1987, pp. 633–638.
- ^ a b c Boyer et al. 2007, p. 457.
- ^ "Surrender of Atlanta, September 2, 1864". Marietta Street Artery Association. Archived from the original on December 12, 2010. Retrieved January 18, 2011.
- ^ Cox 1994, p. xv.
- ^ "Today in History: September 1". Library of Congress. Archived from the original on January 15, 2011. Retrieved January 21, 2011.
- ^ a b c "Industrial Atlanta". National Park Service. Retrieved February 21, 2011.
- ^ Cooper, William J. Jr.; Terrill, Thomas E. (2008). The American South: A History, Volume 2. Rowman & Littlefield. p. 468.
- ^ "Atlanta Markers". The Historical Marker Database. Retrieved February 6, 2011.
- ^ "Death of McPherson Marker". The Historical Marker Database. Retrieved February 6, 2011.
- ^ "Grant Park Historic District". National Park Service. Retrieved December 28, 2010.
- ^ do, Things to. "Atlanta's Cyclorama: A timeline and history of the Battle of Atlanta painting". The Atlanta Journal-Constitution. Retrieved August 1, 2019.
- ^ Hitt, Jack. "Atlanta's Famed Cyclorama Mural Will Tell the Truth About the Civil War Once Again". Smithsonian. Photographs: Joshua Rashaad McFadden. Retrieved August 1, 2019.
- ^ Emerson, Bo. "Restored Cyclorama opens". The Atlanta Journal-Constitution. Retrieved August 1, 2019.
- ^ "THE POTTER HOUSE ATLANTA Photo from nature By G. N. Barnard". Digital Library of Georgia. Retrieved February 26, 2011.
References
- Black, III, Robert C. (1952). The Railroads of the Confederacy. Chapel Hill, NC: University of North Carolina Press. OCLC 445590.
- Bonds, Russell S. (2009). War Like the Thunderbolt: The Battle and Burning of Atlanta. Westholme Publishing. ISBN 978-1-59416-100-1.
- Boyer, Paul; Clark, Clifford Jr.; Kett, Joseph; Salisbury, Neal; Sitkoff, Harvard; Woloch, Nancy (2007). The Enduring Vision (6th ed.). Houghton Mifflin. ISBN 978-0-618-80163-3.
- Castel, Albert. Decision in the West: The Atlanta Campaign of 1864. Lawrence: University Press of Kansas, 1992. ISBN 978-0-7006-0748-8.
- Cox, Jacob D. (1994). Sherman's Battle for Atlanta. Da Capo Press. ISBN 978-0-306-80588-2.
- Ecelbarger, Gary (2010). The Day Dixie Died: The Battle of Atlanta. Macmillan. ISBN 978-0-312-56399-8.
- Eicher, David J. (2001). The Longest Night: A Military History of the Civil War (1st ed.). New York, NY: Simon & Schuster. ISBN 978-0-7432-1846-7.
- Garrett, Franklin (1987). Atlanta and Environs: A Chronicle of Its People and Events, Volume 1. University of Georgia Press. OCLC 191446.
- Golden, Randy. "The Battle of Atlanta". About North Georgia. Archived from the original on December 19, 2010. Retrieved December 27, 2010.
- Hess, Earl J. July 22: The Civil War Battle of Atlanta. Lawrence, KS: University of Kansas Press, 2023. ISBN 978-0-7006-3396-8.
- Hood, John Bell. Advance and Retreat: Personal Experiences in the United States and Confederate States Armies. Lincoln: University of Nebraska Press, 1996. ISBN 978-0-8032-7285-9. First published 1880 for the Hood Orphan Memorial Fund by G.T. Beauregard.
- Hood, Stephen M. John Bell Hood: The Rise, Fall, and Resurrection of a Confederate General. El Dorado Hills, CA: Savas Beatie, 2013. ISBN 978-1-61121-140-5.
- Kennedy, Frances H. (1998). The Civil War Battlefield Guide (2nd ed.). Houghton Mifflin Harcourt. ISBN 0-395-74012-6.
- Livermore, Thomas Leonard (1900). Numbers and Losses in the Civil War in America, 1861–1865. Houghton, Mifflin and Company.
- Reid, Whitelaw (1868). Ohio in the War: Her Statesmen, Her Generals, and Soldiers. Moore, Wilstach & Baldwin.
- Swan, James B. (2009). Chicago's Irish Legion: the 90th Illinois Volunteers in the Civil War. Southern Illinois University Press. ISBN 978-0809328901. OCLC 232327691.
- Symonds, Craig (1994). Joseph E. Johnston: A Civil War Biography. W.W. Norton & Company. ISBN 978-0-393-31130-3.
Memoirs and primary sources
- Sherman, William T., Memoirs of General W.T. Sherman, 2nd ed., D. Appleton & Co., 1913 (1889). Reprinted by the Library of America, 1990, ISBN 978-0-940450-65-3.
- U.S. War Department, The War of the Rebellion: a Compilation of the Official Records of the Union and Confederate Armies. Washington, DC: U.S. Government Printing Office, 1880–1901.
Further reading
- Allison, David (2018). Attacked on All Sides: The Civil War Battle of Decatur, Georgia, the Untold Story of the Battle of Atlanta. With chapters by Lisa Rickey and Blaise J. Arena. North Charleston, South Carolina: CreateSpace Independent Publishing Platform. ISBN 978-1977761903. LCCN 2017915794. OCLC 1029354282. OL 39611957M.
- Cozzens, Peter (2002). Battles and Leaders of the Civil War. University of Illinois Press. ISBN 978-0-252-02404-7.
- Dodge, Grenville Mellen (1910). The Battle of Atlanta and Other Campaigns, Addresses, Etc. The Monarch Printing Company.
- Foote, Shelby (1974). The Civil War, A Narrative: Red River to Appomattox. Random House. ISBN 0-394-74913-8.
- McDonough, James Lee (2016). William Tecumseh Sherman, In the Service of my Country, A Life. W.W. Norton & Company, New York. ISBN 978-0-3932-4212-6.
- Secrist, Philip L. (2006). Sherman's 1864 Trail of Battle to Atlanta. Mercer University Press. ISBN 978-0-86554-745-2.
Category:1864 in Georgia (U.S. state) Battle Category:Battles of the American Civil War in Georgia (U.S. state) Category:Battles of the Western Theater of the American Civil War Category:Conflicts in 1864 Battle Battle Category:July 1864 events Category:Union victories of the American Civil War